| Home Page
Photo Page
Contact Page
Favorite Links
Custom Page
Whats New Page
|
|
 |
NITRO CASE MODZ
Thanks for stopping by my site, for starters. Just to let you know right off i'm not selling anything just giving ideas and points of view. Also if you decide to use any of my ideas I will not be held liable for any of your screw-ups, feel free to give me credit though, everyone likes a cookie.
Let me give you some current updates, I got rid of the Dragon Orb 3. The noise from that thing is still ringing in my head. I ended up tearing it apart and modding it with a Dragon Orb 1. I built in an additional fan and JB welded it together. I ended up with a quieter dual fan Orb Heatsink. All was going great and the inner fan hit its 50K hour mark or close to it and took a nose dive. So I had to pick up another heatsink, and found myself purchasing a Volcano 9 for way to much money, but you know how quick you want to get back up and running. Well I am going to have to throw a review in for the Volcano 9 now. |
My Favorites Include
Realistic Multiplayer Swat vs. Swat Quake3 Mod
Goto www.Urbanterror.net
Awesome PC Help Forum check out..
www.Computing.net
Case Lighting at affordable prices..
www.Beingseen.com
Great Case Mod Gallery..
www.Fast-mhz.com
|
Mostly I will showcase Case Modz, that are quick, cheap, and easy like the one below.
Well the PC has been bone for sometime now and all has gone great. I have to give credit to Soyo, I have been extrememly impressed with their K7V Dragon plus. I only had one hang up, and that was that when my heatsink took a dive and the mobo warned me about it and shut off. After I replaced it I had to reset the cmos, and re-seat my DDR. If I did'nt think to re-seat my DDR I would have went through a couple hours of meticulously rebuilding the PC in hopes of curing the problem. Other then that issue though the AMD XP 1700+ combined with the Soyo Dragon Plus it artistry in motion. |
Please if you have a Case Mod Pic or Idea let me know!
Mail me..
Please take a sec and make me a favorite.
|

Get more out of that wimpy lighting!
This is the first project Im gonna throw on here.
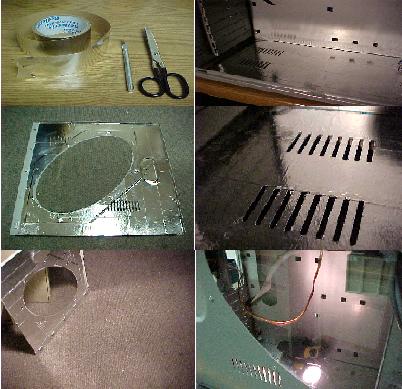
What I have done here is purchased some reflective insullation tape at Home Depot, if you dont have a store located close the tape Manufacturer is Reflectix (800)879-3645.
All you should need is 1 roll which runs about 2.50, an exacto knife, and a pair of scissors.
Total work time for case bottom, and inside of case side about 15-20 min.
This project is definately easiest when you are first slapping your system together, you will have a little more elbow room available.
Just start laying your tape down side by side as close together as you can. Dont worry about your ventilation holes, thats where the exacto comes into play.
As you can I see covered pretty much everthing on the inside of the case wall except the oval window. I added a couple of pics just to show the amount of added reflective light.
After you get it all taped you should go back and exacto out those vent holes.
This is a really simple project, the benefits will be obvious after you add your lighting. What most people dont think of is that both the Neon lights, and the Cold Cathode light are circular. The standard case dosnt really have any reflectivity so wherever you place your light chances are you are going to lose about 100 degrees of your 360 spectrum. By doing the inside and bottom of your case you can recapture a lot of lost light. Its a simple concept, and a simple project.
One thing also to consider is spacing the light an inch or two above the case bottom.
Have Questions, Send me a line.. |
|
|


